Your First Daggerheart Session: What to Expect at the Table
Daggerheart is one of those games that sounds familiar right up until the moment it isn’t. If you’ve played fantasy TTRPGs before, you’ll recognize the bones—characters with classes, a GM running the world, dice determining outcomes. But sit down for your first actual session and you’ll quickly notice that the moment-to-moment feel at the table is something different. More cinematic. More emotionally charged. More alive.
This guide breaks down the four systems that will shape your experience most: the Hope and Fear dice, the spotlight, the stress track, and rest. Whether you’re a player sitting down for session one or a GM who’s done the reading but hasn’t run it yet, knowing what to expect makes all the difference. If you haven’t picked up a copy yet, check out our Daggerheart review for a full breakdown of what makes the system worth your time.

The Duality Dice: Hope and Fear in Play
Every time your character takes an action in Daggerheart, you roll two d12s—one for Hope, one for Fear. Add them together to get your result, then look at which die landed higher. That second piece of information is what makes Daggerheart feel distinct from almost every other system on the market.
A high total is good. That part is familiar. But whether that high total comes with Hope or Fear changes the texture of the moment in ways that go well beyond pass or fail.
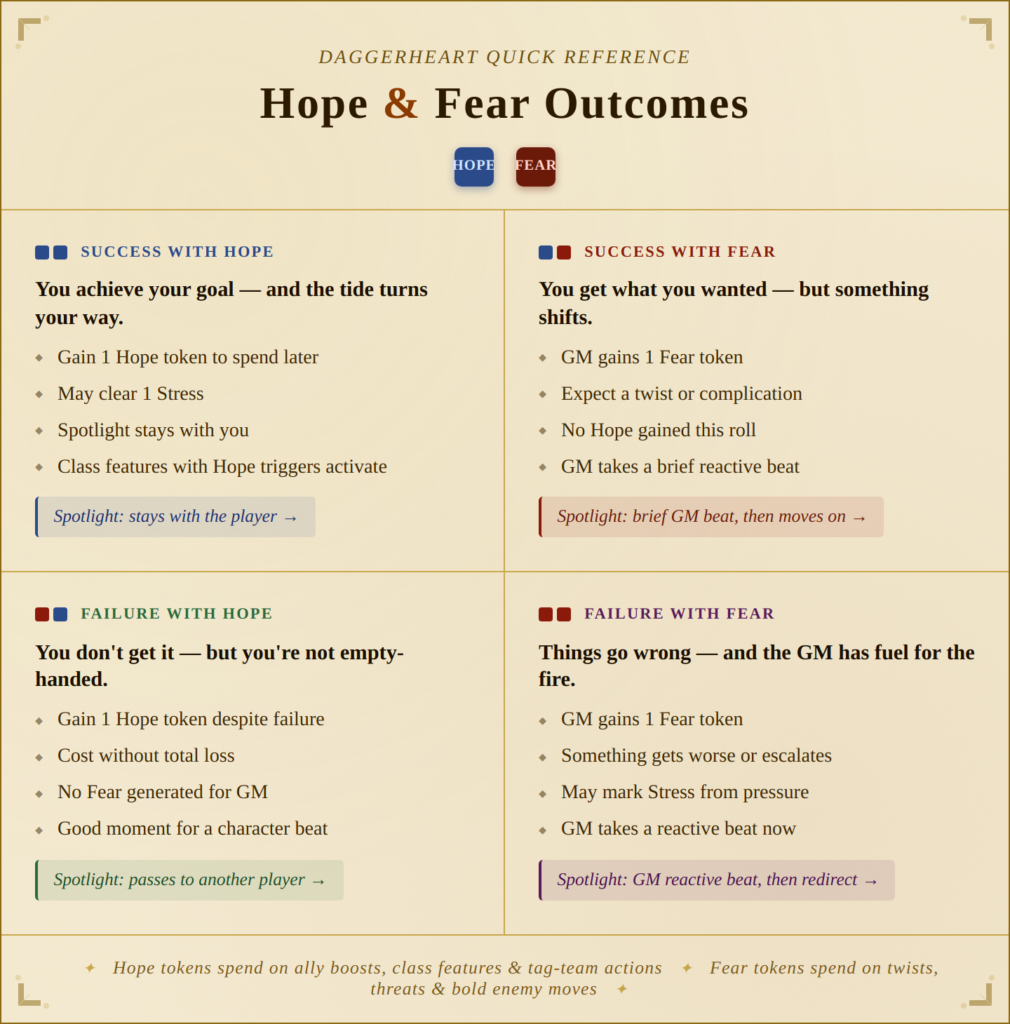
What Hope and Fear Actually Do
A success with Hope means you got what you wanted and the narrative leans in your favor. You might gain a Hope token, clear some stress, or unlock a class feature. Hope tokens are a shared resource players can spend later to boost allies, activate special abilities, or pull off collaborative moves that feel genuinely heroic. When Hope is flowing, players have real mechanical power—not just over their own characters, but over each other’s moments.
A success with Fear, or a failure with Fear, hands the GM a resource instead. Fear tokens let GMs introduce twists, push threats forward, give enemies bold moves, or complicate a scene that seemed under control. The key thing to understand here is that Fear isn’t punishment—it’s the system making sure the story stays tense. You can succeed and still generate Fear. That’s by design.
A failure with Hope is where things get interesting in unexpected ways. Your character doesn’t get what they wanted, but you gain a Hope token. The story costs you something, but leaves you with something to spend. Over a session, this creates a rhythm of pressure and resource-building that feels very different from the flat “you missed” of other systems.
Getting Comfortable with the System
New groups often spend the first session overthinking the consequences. The practical advice from experienced Daggerheart tables is to start simple: focus on success or failure first, then add the Hope/Fear layer as you get comfortable.
Before each roll, try asking players “What are you hoping to get here?” out loud. It takes ten seconds and dramatically improves the quality of whatever narrative beat follows. When you know what a character wants, a Fear complication becomes specific rather than generic—and specific complications are always more interesting.
You don’t need to invent four wildly different outcomes for every roll. A simple extra cost, an unexpected twist, or a new opportunity beats work perfectly well while you’re learning. Let players suggest Hope and Fear consequences, too. It takes some weight off the GM and gets everyone more invested in the outcome.
Spotlight: How Turns Actually Work
If you’re coming from D&D 5e, the spotlight system will feel the most alien. There’s no initiative list. There’s no fixed turn order where every player waits their moment and then acts. Instead, Daggerheart treats action flow the way a TV showrunner treats editing—you cut to where the drama is.
For a broader look at how this compares mechanically to other systems, our Daggerheart vs D&D 5e breakdown covers the full picture.
Following the Fiction
In practice, spotlight works like this: the GM sets a scene, a player declares what their character does, they roll, and the consequence of that roll determines who the camera follows next. When players roll well—especially with Hope—the spotlight tends to stay with them. They have momentum. When Fear shows up, the spotlight briefly flicks to the GM for a reactive beat (a threat surges forward, an enemy makes a move, something shifts), then swings back to the players.
This is intuitive once you’ve seen it in motion but can feel chaotic in text. The session zero conversation worth having is about spotlight expectations. Daggerheart assumes you’ll follow the drama rather than wait for your turn. On larger tables, this matters even more—without that shared understanding, some players will go quiet while others are active, and the GM won’t know to redirect.
Practical Spotlight Advice
Three things that make spotlight run smoothly from the first session:
Ask for actions in fiction first (“What do you do?”) before you call for a roll. This grounds the scene and makes the mechanical result feel earned. After any Fear result, take a short GM beat—show a threat move, reveal something new, escalate a danger—then hand spotlight to a different player to break it up. Encourage players to loop each other in: “I pin the guard to the wall. Are you ready to finish this?” Both players feel involved, the fiction advances, and the spotlight passes naturally.
Groups that really struggle with open spotlight can use a loose initiative order around the table and treat it as a default—not a hard rule—while they adjust. The goal is flexibility, not chaos.
Stress: The Other Resource You’re Managing
Daggerheart tracks two separate pools of damage: Hit Points for physical harm and Stress for everything else. Fear, exhaustion, magical strain, embarrassment, moral weight—Stress is the mechanical representation of how a character is holding up emotionally and mentally. This separation is one of Daggerheart’s most distinctive design choices, and it shapes session flow in ways that take a bit of time to internalize.
Our Daggerheart character creation guide covers how Stress slots are set up for each class if you want to look at the numbers before your first session.
How Stress Accumulates and Matters
Characters start with several Stress slots. You mark them from enemy moves, Fear complications, certain abilities, or hard choices the fiction demands. When you fill that last Stress slot, your character becomes Vulnerable—a condition that makes the next few rolls feel genuinely dangerous. If you have to take more Stress with no free slots, it converts to HP damage instead, which means a character under prolonged emotional pressure starts taking physical wounds. It’s an elegant loop.
Vulnerable, Hidden, and Restrained are the most common conditions you’ll encounter. They’re temporary states that modify how rolls land and how enemies interact with you—think of them as color and mechanical texture layered on top of the basic action economy.
The most important thing to communicate to new players: Stress going up isn’t failure. It’s texture. Daggerheart wants Stress to move up and down over a session, not sit at zero. Characters who take no Stress are probably not engaging with the fiction at any meaningful level of risk.
Encourage players to describe what Stress looks like for their character—shaking hands, a cracked joke that doesn’t land, haunted eyes after a close call. The system is designed to support that kind of narrative detail, and it makes the mechanical bookkeeping feel like actual storytelling.
Rest and the Rhythm of a Session
Stress doesn’t have to stay high for long. Daggerheart’s rest system is built for responsive pacing—you don’t have to wait until the end of the day to let characters breathe.
Short and Long Rest
Short pauses in the fiction, or specific narrative moves, can clear one or two Stress slots without requiring a full scene. A moment to catch breath after a chase, a friend saying the right thing, a quick bit of dark humor that breaks the tension—these can all function as brief recovery beats that reset the emotional pressure gauge slightly.
Longer rests—proper downtime scenes between arcs or at natural story breaks—clear more Stress, remove conditions, and function like a season finale reset. Characters come back to the next session freshened up, with room to accumulate pressure again.
In practice, what this means for your first session is that you should feel comfortable calling for short narrative breathers when the table needs them. The pressure, choice, consequence, brief recovery loop is Daggerheart’s core rhythm—it’s not something to avoid or speed through. That breather between tension beats is where character moments happen, where relationships develop, and where players often remember what they’re actually playing for.
A Simple Session Flow to Expect
Your first session will probably move through something like this cycle, repeated with variations:
The GM opens in medias res and immediately asks who’s taking point and what they’re doing. A player rolls Hope/Fear on their first obstacle. If Hope comes up, they gain a resource and the spotlight stays with them. If Fear shows up, the GM takes a brief reactive beat—something complicates, shifts, or threatens—then redirects spotlight to someone else’s response. Someone marks Stress from a complication or an enemy move. The stakes feel real. Then, after the tension crests, there’s a brief breather where Stress clears slightly and characters have a moment to be human.
That cycle is the heartbeat of the game. Experienced Daggerheart GMs describe it as feeling like editing a TV episode rather than refereeing a rules encounter, and that comparison is accurate.
A Quick Reference: Hope/Fear Outcomes
You can print this and keep it at the table for session one:
- On a Success with Hope: Character achieves goal, gains a Hope token, may clear 1 Stress. Spotlight stays with the player.
- On a Success with Fear: Character achieves goal, but the GM gains a Fear token. Expect a twist or complication before the spotlight moves on.
- On a Failure with Hope: Character doesn’t achieve goal, but gains 1 Hope token. Cost without total loss.
- On a Failure with Fear: Character doesn’t achieve goal, GM gains Fear. The GM takes a reactive beat—something gets worse.
Getting Ready for Your Table
If you’ve done a session zero and built characters together, you’re already ahead of the curve. The mechanical setup for Daggerheart—choosing your class, ancestry, community, and starting equipment—actually does a lot of work in establishing what your character cares about before the first die rolls. If you haven’t done character creation yet, our Daggerheart classes for beginners guide is a good starting point for players who aren’t sure where to land.
For GMs, the best thing you can do for session one is drop into the action immediately. Don’t open with a tavern. Start at the gates, mid-heist, or in a tense negotiation, and ask “who’s taking point, and what are you doing?” within the first two minutes. Let the Hope/Fear dice do the narrative work from there.
Daggerheart rewards GMs who say “yes, and” or “yes, but” rather than flat pass/fail rulings. The dice generate the emotional tone—your job is to follow that tone into the fiction, not override it. If you’re still building your GM toolkit for running narrative-forward games, our articles on balancing combat and roleplay and session prep in 30 minutes have practical techniques that transfer well to Daggerheart’s playstyle.
What Sticks After Session One
The thing players most often say after their first Daggerheart session is that they were surprised by how invested they were in the outcomes. Not because the stakes were mechanically high—though they can be—but because every roll carries emotional weight. You’re not just trying to hit a target number. You’re watching for which die is higher, hoping for Hope, bracing for Fear, and suddenly very aware that either outcome will push the story somewhere interesting.
That engagement is the whole point. Daggerheart isn’t trying to simulate a combat encounter or reward tactical positioning. It’s trying to generate the feeling of an actual play show where characters are under pressure, relationships matter, and every scene has emotional stakes. If your table leans into that—if players describe their Stress, if the GM makes Fear feel like narrative momentum rather than punishment—the system delivers on that promise pretty quickly.
By session two, the Hope/Fear read will be instinctive. The spotlight flow will feel natural. Stress will be something your characters carry as part of their story rather than a resource you’re racing to reset. Your first session is just learning the rhythm. The game itself starts once that rhythm clicks.
Want to go deeper on Daggerheart before you play? Read our full Daggerheart review or start at the beginning with What is Daggerheart? If you’re new to TTRPGs entirely, our guide to running your first TTRPG campaign has everything you need to get your table ready.
Continue Your Journey
- Daggerheart vs D&D 5e: Which System Is Right for You? — A full mechanical comparison for players deciding between the two systems.
- Daggerheart Character Creation: A Step-by-Step Guide — Build your first character before session one.
- Daggerheart Classes for Beginners — Not sure which class to play? Start here.
- Session Zero Strategies — How to set up your table for success before the first session starts.
- Balancing Combat and Roleplay — GM techniques that work especially well with narrative-forward systems like Daggerheart.
Have you played Daggerheart yet? We’d love to know what surprised you most at the table—drop your first session story in the comments.
Sign up for the Forst Stories newsletter to get new Daggerheart guides, RPG news, and GM tips delivered straight to your inbox.
RPG news, GM tips, and system deep dives — straight to your inbox, no filler.