
Daggerheart Encounters Without a Grid: A GM’s Guide
You have got a room full of players, a monster stat block, and no battle map. In Daggerheart, that is not a problem to solve, it is the default mode the system was built for. If you have been running fights by measuring squares out of habit, or you have never touched a grid at all and are not sure how anyone tracks positioning without one, this is the practical rundown of how encounters actually work when you lean into range bands and zones instead.
Range Bands Are Your Real Battle Map 🗺️
Daggerheart replaces rulers and grid squares with five named ranges: Melee, Very Close, Close, Far, and Very Far. Melee means close enough to touch, a few feet at most. Very Close covers roughly five to ten feet, close enough to make out fine details on a target.
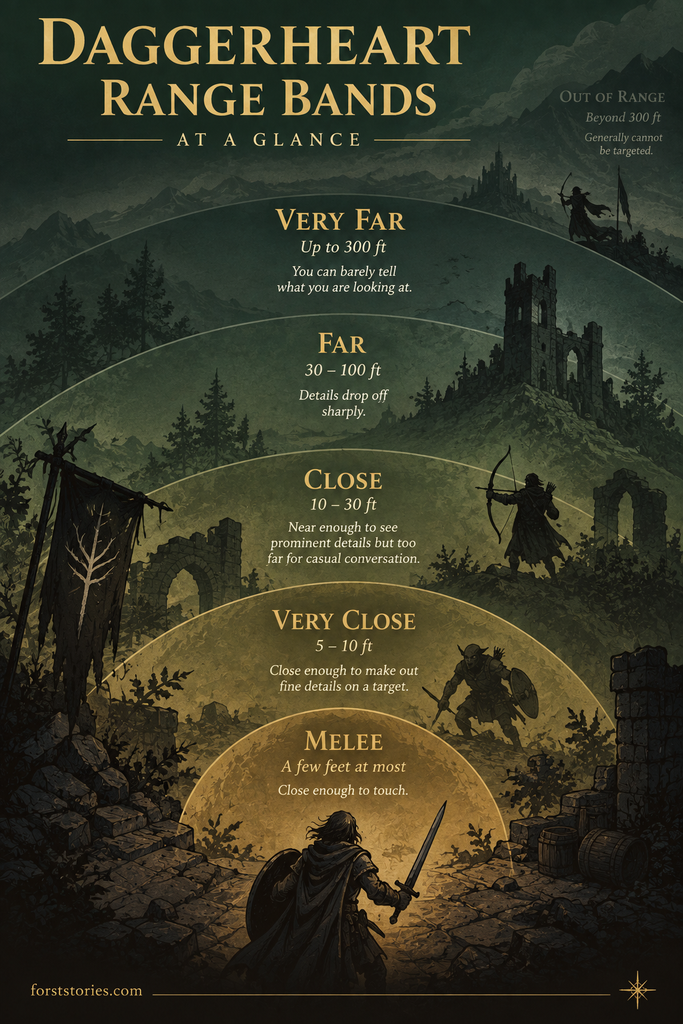
Close stretches to about ten to thirty feet, near enough to see prominent details but too far for casual conversation. Far runs from thirty to a hundred feet, where detail drops off sharply, and Very Far covers up to three hundred feet, where you can barely tell what you are looking at. Anything beyond that is Out of Range and generally cannot be targeted at all.
These bands are not flavour text, they are the mechanic. Movement, targeting, and area effects all key off them. A character under pressure can reposition to somewhere within Close range as part of an action roll for free, but crossing from Far or Very Far into Melee needs a successful Agility Roll, because that is a genuinely risky sprint across open danger.
The GM’s job is to call ranges out loud, every time, using the same five words. Do not say “he is kind of far away” one round and “still not that close” the next. Say “the archer is at Far range” and keep using that exact term so players can build a mental map they can act on with confidence.
Painting the Battlefield in Zones and Landmarks 🏞️
Without a grid, your battlefield is built from description, not measurement. Instead of coordinates, give players landmarks: the collapsed bridge, the burning cart, the ledge above the pit. Each one becomes a reference point you can hang a range call onto.
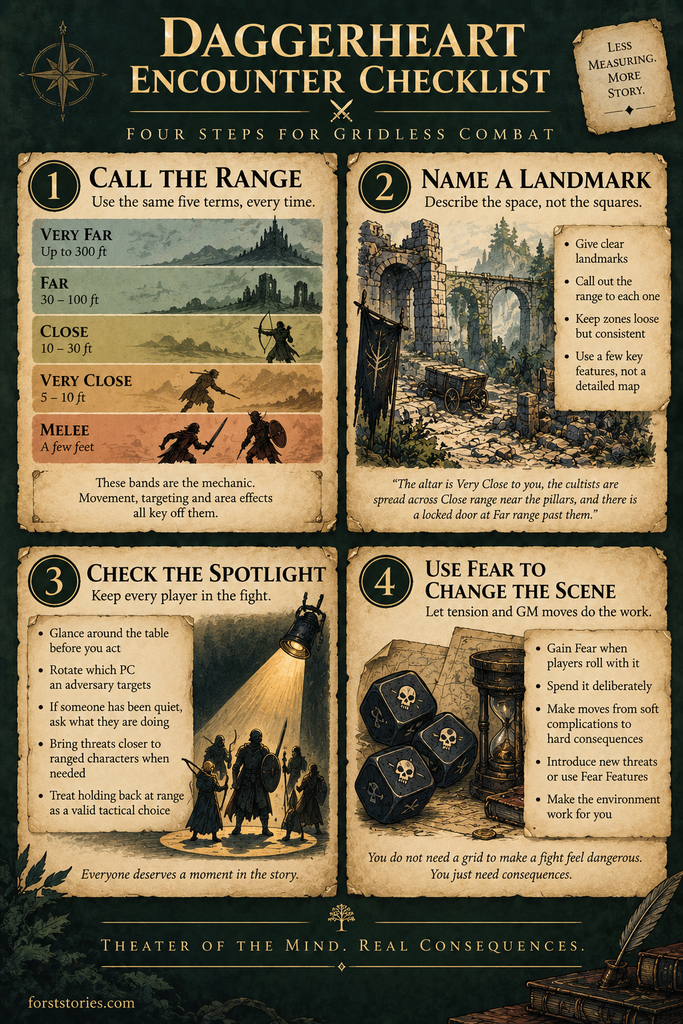
When you introduce a location, say something like “the altar is Very Close to you, the cultists are spread across Close range near the pillars, and there is a locked door at Far range past them.” That single sentence does the work a whole grid map would otherwise do, and it stays entirely narrative.
Keep zones loose but consistent. If a player asks whether they can reach the chandelier rope, answer in terms of the range band and what it would take to get there, not in feet or squares. The goal is that everyone at the table can picture the space well enough to make tactical choices, without anyone needing to convert description into geometry first.
A short list of landmarks per scene is usually enough:
- One or two features at Melee or Very Close range that anchor the immediate action
- A midground feature at Close range players might move toward or retreat behind
- A background feature at Far or Very Far range that hints at what else is in play
Keeping Every Player in the Fight 🎭
Range-based combat can quietly sideline players if you are not watching for it. A rogue sitting at Far range while the fight is happening at Melee is not doing anything wrong, but if the spotlight never swings their way, they will feel like spectators. Managing that is on you, not on the map.
Before you narrate an adversary’s action, glance around the table and ask who is engaged, who is holding back deliberately, and who has been quiet for a round or two. Daggerheart’s spotlight structure already gives you an opening here: a GM turn begins when the spotlight passes to you, and one of the standard example GM moves is simply to spotlight an adversary near a specific PC.
Use that tool on purpose. If the ranged character has been picking off enemies from Very Far range uncontested, bring an adversary within Close range of them, or have the environment shift so their vantage point is no longer safe. It is a legitimate move, not a punishment, and it keeps the fight honest across everyone’s position rather than just the melee cluster.
- Rotate which PC an adversary’s attention lands on each round rather than always targeting whoever hit hardest
- If someone has not acted in a while, ask them directly what they are doing right now
- Treat “holding back at range” as a real tactical choice worth narrating, not a gap to ignore
Letting Fear and GM Moves Drive the Difficulty ⚔️
Daggerheart does not need grid-based tactical complexity to feel dangerous, because difficulty and pacing already live in the Fear economy and your GM moves, not in terrain math. When a player rolls with Fear, you gain a Fear token and the option to make a move, ranging from a soft complication to a hard, direct consequence.
Spend Fear deliberately rather than hoarding it. You can spend it to seize the spotlight and act immediately, to have an adversary use a Fear Feature, or to bring in a new threat that was not previously foreshadowed. A skirmish against low-tier foes should cost you a Fear or two across the whole scene, while a major set-piece battle against a Solo or Leader adversary can reasonably burn through four to eight.
This is also where soft and hard moves matter more than any battle map would. Use gentler moves, like revealing a new detail or letting an NPC act on their motive, when players succeed with Hope. Save the harder moves, an adversary attacking without warning, the party getting split up, for rolls with Fear or outright failure. If you want the fuller set of Fear-driven adversary options and expanded GM tools for running scenes like this, the Daggerheart: Hope & Fear hardcover expansion is worth having on the shelf.
Common Pitfalls Worth Watching For ⚠️
The most common failure mode is grid-think leaking back in without anyone noticing. GMs who learned tactical combat on squared paper often start silently tracking exact distances in their head, then describe positioning in ways that only make sense if everyone had a hidden map. Watch for yourself reaching for phrases like “you’d need three more feet” and catch it before it becomes a habit.
The second pitfall is inconsistent range calls. If Close range meant one thing in round one and something looser by round three, players stop trusting your calls and start second-guessing every move, which slows the table down far more than a grid ever would. Pick your terminology and hold the line on it.
A smaller but real issue is over-describing. You do not need paragraph-length scene-setting every round. A single clear sentence naming the range and the relevant landmark is usually enough, and it is easier for players to act on than a wall of atmospheric prose.
A Worked Example Encounter 📜
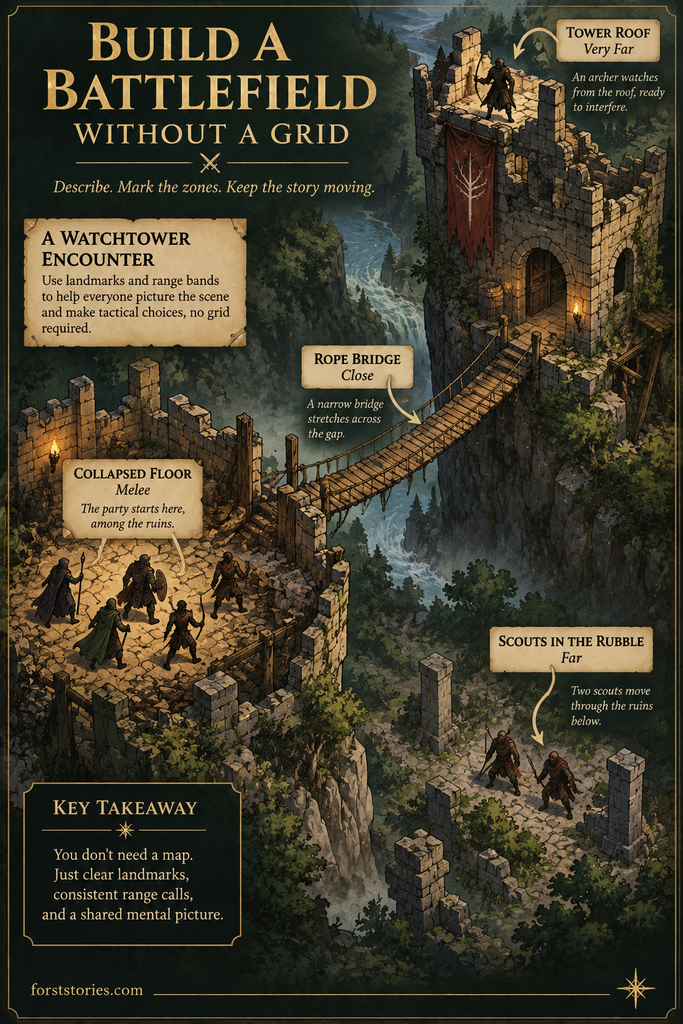
Picture a skirmish in a ruined watchtower. You open with the zones: “You’re standing on the collapsed second floor, Melee range of each other. A rope bridge to the tower’s outer wall is at Close range. Below, at Far range, two scouts are climbing up through the rubble.”
The wind through the broken stone carries the scouts’ voices before their footsteps, sharp and urgent, closing fast.
That single italicised line is the flavour seasoning, not the main course. From there, you stay mechanical. A scout closes to Close range and one player rolls with Fear on their reaction. You spend the Fear you just gained to have the second scout use its Fear Feature, some kind of alarm call, bringing a third adversary into the scene at Very Far range on the tower’s roof.
Now you check the table. The player who has been at Very Close range near the bridge has not acted in two rounds, so you spotlight the newly arrived rooftop adversary taking aim at them specifically, forcing a choice: hold position or retreat across the bridge. That one exchange uses range bands for clarity, zones for the fiction, Fear for pacing, and a deliberate spotlight move, all without a single square being drawn.
Related Reading on Forst Stories 📚
If encounter pacing has you thinking about the wider GM toolkit, a few other posts on this site cover adjacent ground. Game Mastering in Daggerheart: Agenda, Principles, and GM Moves lays out the philosophy behind the moves used above. How to Read the Daggerheart GM Guide: Core Principles in Plain Language is a good primer if you are newer to the system generally, and Hope and Fear as GM Tools: Keeping Tension Fair, Not Arbitrary goes deeper into the Fear economy this post only touches on.
None of this makes theatre of the mind the “correct” way to run Daggerheart. Grid play is a perfectly valid choice, especially for tables that enjoy precise tactical positioning. Range bands and zones are simply the tool the system hands you by default, and once you trust them, they carry a fight just as well as any map.
RPG news, GM tips, and system deep dives — straight to your inbox, no filler.


