How to Unlock Lightning and Elemental Imbue in Crimson Desert
Most players who ask “how do you find lightning in Crimson Desert?” are looking in the wrong place. Lightning isn’t loot you pick up from a chest or a skill you unlock through the main quest — it’s hidden inside a specific Abyss challenge chain that the game barely acknowledges in your quest log. If you’ve reached Chapter 4 and been staring at your skill tree wondering why the Imbue Element nodes are locked, this guide is exactly what you need.
This walkthrough covers the full path from the Spire of the Stars through to unlocking Lightning, explains what elemental imbue actually does in combat, and clears up the confusion around the Dancing Blade / Silver Lightning visual effect that trips up a lot of rapier players.
Why Elements Work the Way They Do in Crimson Desert
Crimson Desert doesn’t treat elemental powers like most action RPGs. Flame, Frost, Lightning, and Wind aren’t tied to weapon types or dropped by elite enemies — they’re rewards locked behind Abyss island chains, each accessed through a different Spire. You complete a chain, claim a final Abyss Artifact, and the element is silently unlocked with a small notification in the top-left of your screen.
Imbue Element is a separate system layered on top of that. Once you have Lightning (or any element), you then need to spend Abyss Artifacts in the red offense branch of the skill tree to assign elemental effects to specific attacks — things like Turning Slash, Charged Shot, Force Palm, and Meteor Kick. The element unlock and the imbue unlock are two distinct steps, which is why players often complete the chain and then wonder why nothing visibly changed in combat.
The short version: unlock the element first through the Abyss, then invest Abyss Artifacts in the Imbue Element skill nodes, then activate your chosen element through the radial menu. All three steps have to happen.
Starting Point: Reaching the Spire of the Stars
Lightning becomes available in Chapter IV: The Price of Knowledge. If you’re not there yet, this chain is locked off, but once you hit Chapter 4 and the Scholastone Institute area opens up, you’re far enough along to start.
The Spire of the Stars sits north-east of the Scholastone Institute. Follow the road past the banquet hall and keep heading up — the Spire entrance is hard to miss once you’re on the right road. The first time you visit, you’ll need to open the Spire rather than just entering it, which involves a puzzle inside.
Opening the Spire (One-Time Setup)
The Spire’s interior puzzle asks you to collect three engraved stones by using Force Palm on marked walls, slot them into a central wall panel, then step onto symbol plates to match a mural pattern. Getting the pattern right activates the elevator and opens the Abyss portal at the top of the Spire.
Once that portal is active, you don’t need to solve this puzzle again. Every island in the chain can be fast-travelled to via Abyss view by highlighting Spire of the Stars and selecting the relevant teleporter — even if a cutscene ejects you after completing an island, you can jump back in from the map.
The Lightning Chain: Four Islands, One Reward
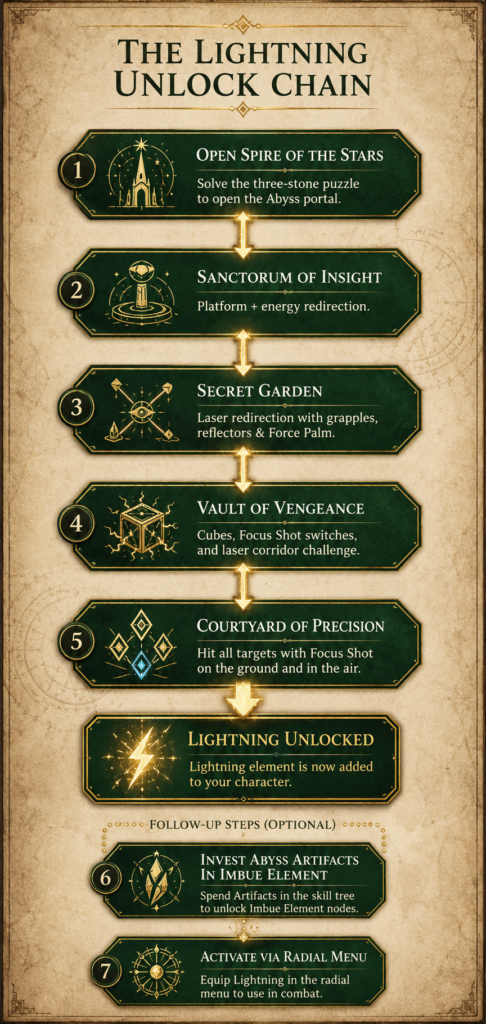
Lightning is gated behind four consecutive Abyss islands. Each one awards an Abyss Artifact and unlocks the next. None of them individually give you Lightning — the unlock only triggers when you finish the fourth and final island.
Sanctorum of Insight
Access this from Abyss view by selecting the Sanctorum of Insight teleporter under Spire of the Stars. The Sanctorum is the first link in the chain, and its puzzle centres on riding a moving platform between pillars using the Axiom Force interaction to redirect energy and reach the exit.
Completing it awards an Abyss Artifact and opens the route to Secret Garden. No Lightning yet — just the first step done.
Secret Garden
Secret Garden is a laser-redirection arena. The tools here are grappling-hook latches, movable reflectors, and Force Palm pushes — you’re lining up beams to power a central eye structure. It’s more involved than the Sanctorum, but the game gives you the components you need in the environment.
Finishing it grants another Abyss Artifact and unlocks the Vault of Vengeance teleporter. Look for the Abyss Artifact notification and the new teleporter appearing in Abyss view; there’s no dramatic fanfare between islands.
Vault of Vengeance
This island has three distinct puzzle sections. The first asks you to move electrified cubes into specific sockets using grappling to drop a barrier. The second requires using Focus Shot with your bow to hit paired switches — and then four targets — simultaneously. The third section involves navigating a laser corridor while repositioning an electrified panel and slotting a battery pack using Force abilities.
Clearing all three sections awards another Abyss Artifact and opens the path to the Courtyard of Precision. You’re one island away from Lightning at this point.
Courtyard of Precision: Where Lightning Actually Unlocks
The Courtyard of Precision is the final island on this branch and the one where Lightning actually gets added to your character. Access it from Abyss view after completing the Vault of Vengeance.
How the Courtyard Works
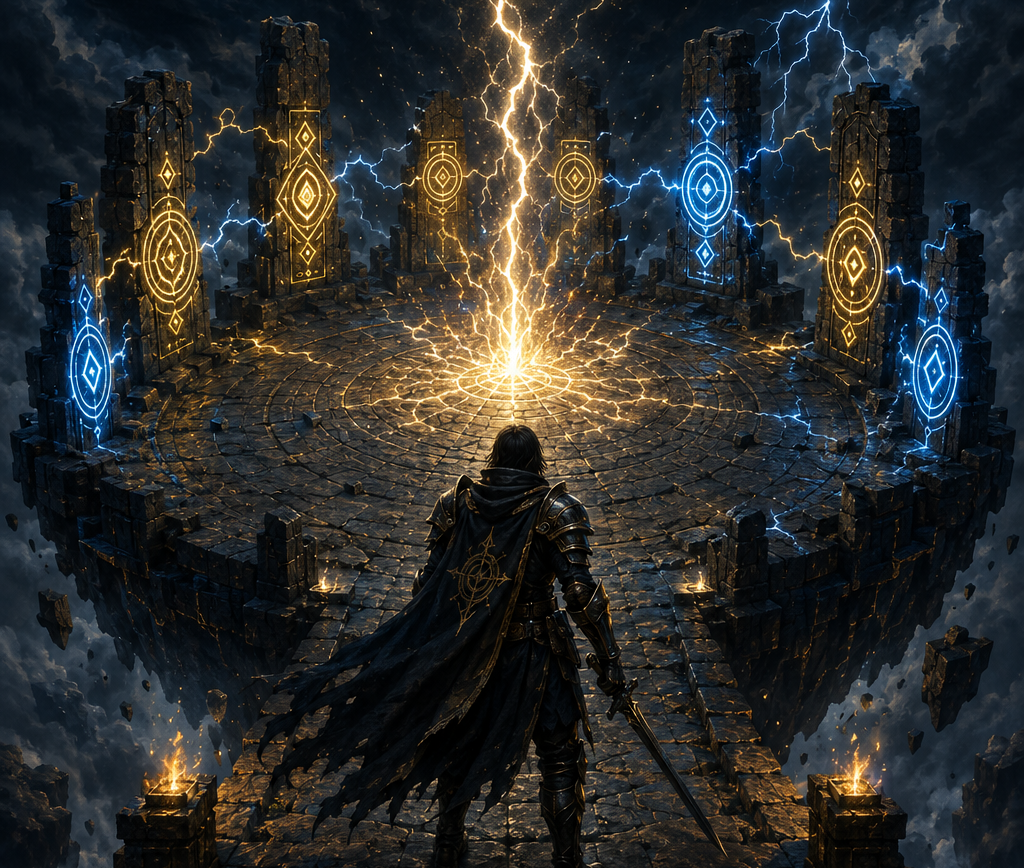
The arena is filled with yellow-lit diamond targets spread across the walls and suspended in the air above. You need to hit all of them. At ground level, work around the south, east, and north walls clearing target groups. Once those are done, use the central air vent to float upward and clear two more sets suspended above the courtyard.
The key mechanic here is Focus Shot with your bow. You tag multiple targets and fire within a tight window — when a target is correctly hit, it turns blue. A hidden timer is running, so if you’re too slow between target groups you may need to start a sequence again.
After clearing everything, activate the power panel in the arena and claim the final Abyss Artifact from the central structure. That’s the unlock moment. It appears as a brief notification in the top-left — you might miss it if you’re not looking, but the Lightning element will now show in your radial menu.
What Elemental Imbue Actually Does
Now that Lightning is unlocked, the Imbue Element nodes in the red skill tree become accessible. This is where a lot of players hit a second wall of confusion, because imbue isn’t a passive bonus — it’s a deliberate system.
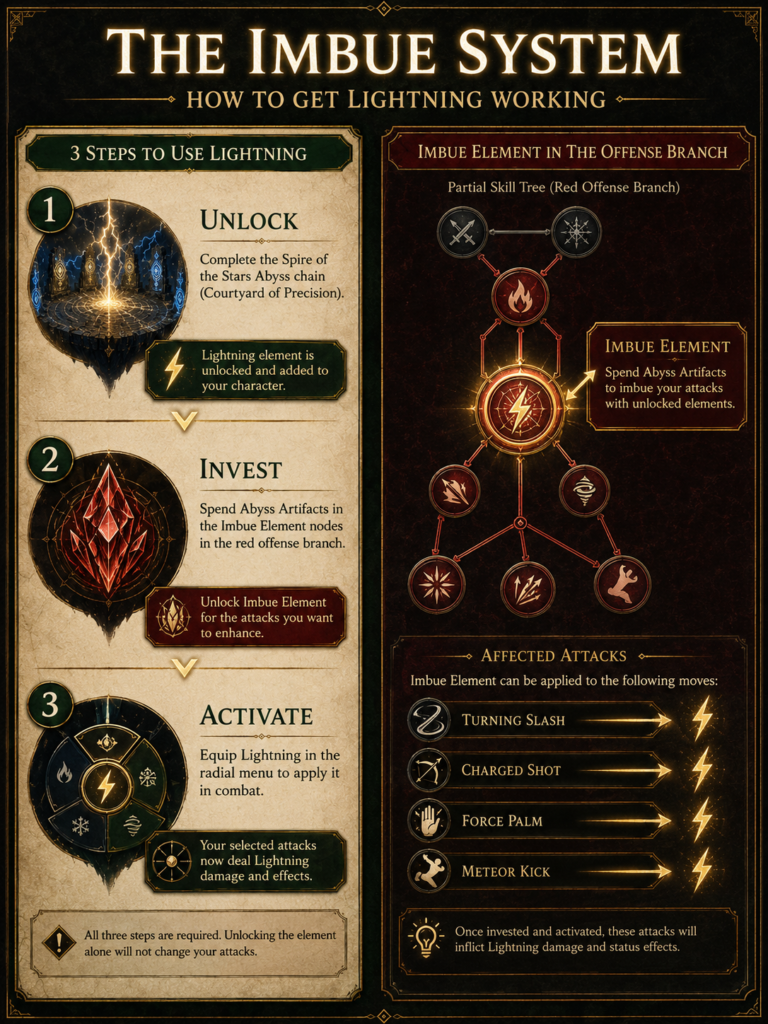
The Imbue Element skill line lets a small set of high-impact moves carry whatever element you’ve selected in the radial menu. Specifically, once you invest Abyss Artifacts across the Imbue Element ranks, you gain elemental versions of:
- Elemental Turning Slash — Turning Slash charged while imbue is active
- Elemental Charged Shot — your bow’s charged shot with an elemental payload
- Elemental Force Palm — the Force Palm ability infused with your active element
- Elemental Meteor Kick — Meteor Kick with elemental damage and additional effects
Each rank in the skill tree adds another move to your elemental toolkit. You’re not enchanting a weapon — you’re specifically authorising certain attacks to carry your active element when conditions are met. Spirit is consumed when these moves fire in elemental form.
Activating Lightning in the Radial Menu
To actually use Lightning, open the function and food radial menu, move to the element slot, and select Lightning. Your Spirit icon will change to reflect the active element. From that point, the Imbue Element moves you’ve purchased will fire with Lightning damage and effects when used.
For a practical Lightning-oriented setup: Lightning Surge is triggered by your mapped heavy-plus-special combination (RT + B on controller), releasing an area-of-effect discharge around you. Elemental Turning Slash activates by holding Right Trigger and Right Bumper to charge Turning Slash, then holding Left Trigger to apply the imbue before releasing all three simultaneously. PC players use the equivalent bindings, but the core logic is the same: perform the base move, then layer the imbue activation while Lightning is selected.
The Dancing Blade / Silver Lightning Question
If you’ve been doing rapier-focused play, you may have noticed a lightning-like flash appearing when you knock an enemy prone with a heavy rapier attack. This is not the same as Lightning Element — it’s purely a visual effect from the heavy attack stagger, and it’s understandably confusing.
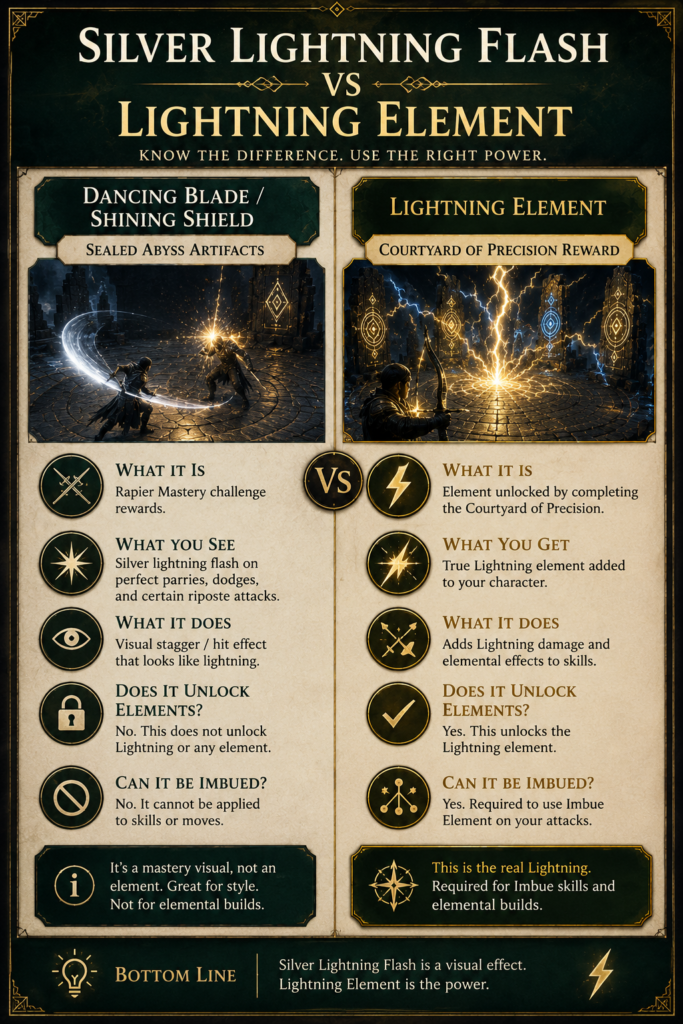
The Dancing Blade, Shining Shield line is a separate series of Sealed Abyss Artifact challenges focused on rapier mastery, tied to the Master of Rapiers achievement. You find these Sealed Abyss Artifacts in the open world — one location is along the road south of Ironwood Farmhouse, others are near the Spire of Clockwork and in the Demeniss area. These challenges ask for things like hitting a prone enemy five times with a rapier or defeating groups under specific conditions within a time limit.
They do not unlock Lightning. They do not unlock Imbue Element. The silver lightning flash is just the visual effect of the heavy stagger — it has nothing to do with the elemental system you’ve been building toward in the Abyss.
That said, once you do have Lightning Element and Elemental Turning Slash unlocked, you can absolutely build a rapier character that layers true Lightning imbue onto that heavy attack followup. It’s satisfying player-driven synergy, but it’s not a quest connection — just good build planning.
Putting It All Together
The full sequence to get Lightning and Imbue working looks like this: reach Chapter 4 and open the Spire of the Stars, then work through the Abyss island chain — Sanctorum of Insight, Secret Garden, Vault of Vengeance, and Courtyard of Precision — collecting an Abyss Artifact from each. After clearing the Courtyard, Lightning is unlocked. Open the skill tree, invest in the Imbue Element nodes in the red offense branch (spending those Abyss Artifacts), then open your radial menu and select Lightning from the element slot. From there, the imbue moves you’ve unlocked will fire with Lightning damage.
It’s a longer unlock path than most players expect for what looks like a basic elemental feature — but the payoff is solid, especially if you’re building toward a Lightning-heavy combat style. If you’re still earlier in the game and exploring the Abyss system more broadly, the fast travel and Abyss Nexus guide covers how to navigate between Spires without losing progress, and the Crimson Desert Beginner’s Guide is worth revisiting if you want a clearer picture of how Abyss Artifacts feed into the broader skill system. If you’re working toward the bounty side of the game at the same time, the bounty system guide runs alongside this content naturally.
Got the Courtyard cleared? Let us know in the comments which elemental moves you’re pairing with Lightning — especially if you’re running a rapier build.
Continue Your Journey
- Crimson Desert Beginner’s Guide: What to Do First and How Everything Works — The foundation guide for the whole game, including early Abyss system orientation.
- How Fast Travel Works in Crimson Desert (and Where to Find the First Abyss Nexus) — Essential for moving between Spires without losing Abyss progress.
- How the Bounty System Works in Crimson Desert: A Complete Hunter’s Guide — Another major system running in parallel with your Abyss progression.
- How to Capture Bounties Alive in Crimson Desert: The Complete Guide — For players who want to engage with the full bounty mechanic.
- How to Use Your Lantern and Read Memory Fragments in Crimson Desert — Covers another Chapter 4 system that intersects with Spire exploration.
Want guides like this delivered to your inbox before they hit the site? Sign up for The Scriptorium Newsletter and get Crimson Desert tips, TTRPG news, and new content every week.
RPG news, GM tips, and system deep dives — straight to your inbox, no filler.