
How to Capture Bounties Alive in Crimson Desert: The Complete Guide (with Bianca Walkthrough)
Alive captures are where the real money is in Crimson Desert’s bounty system. Turn in a target breathing and you collect the full posted reward — let them die and you’re walking away with roughly half that. It sounds straightforward enough until you’re standing over a downed bounty watching the Tie Up prompt refuse to appear, or you’ve accidentally finished them off with one punch too many.
This guide covers the complete alive-capture loop from the moment you spot your target to the constabulary handoff, then walks through one of the game’s trickier early bounties — Bianca at the Church of Hernand — as a full worked example. If you’re just getting started with how bounties work in general, the Crimson Desert bounty system guide covers the fundamentals. Once you’ve got the alive-capture rhythm down, though, it becomes one of the most reliable income streams in the game.
How Alive Captures Actually Work
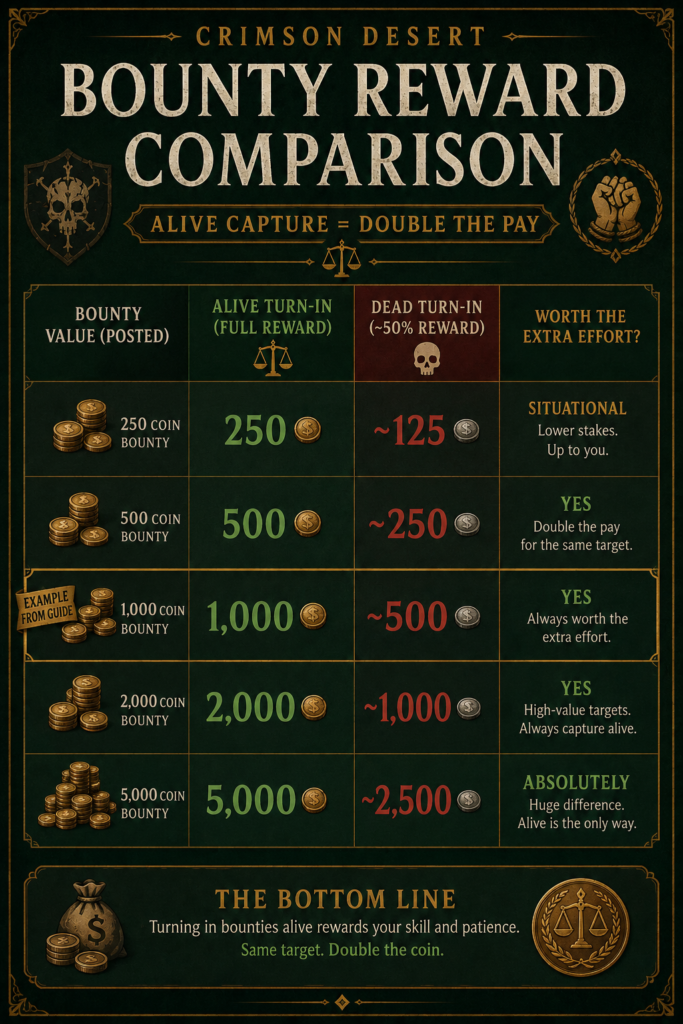
The alive-capture loop has four stages: tackle, punch, tie, and transport. Each one has a specific prompt condition, and if you skip ahead or apply too much force at any point, you’ll either miss the window or kill your target outright. Understanding what the game is looking for at each step is what separates consistent successful captures from frustrating failed attempts.
The Tackle Prompt — and Why It Disappears
This is where most players run into trouble first. The tackle option is context-sensitive, and it has strict conditions for when it appears. The most common mistake is opening with a full combat combo — the moment you start swinging normally, the tackle prompt typically disappears and you’re locked into a standard fight.
The prompt appears most reliably in two situations: when you approach before combat has fully started (ideally crouching as you close the distance), or when your target has been startled and is actively fleeing. If you crouch while approaching, then stand just as you get within range, you should see the tackle cue on screen. Many players find it easier to let the target spot them first and bolt, then sprint after them into more open space where the tackle has room to connect cleanly without getting snagged on furniture or walls.
Don’t open with attacks. Get close, look for the prompt, and commit to the grab before anything else.
Punching to the Tie Up Prompt
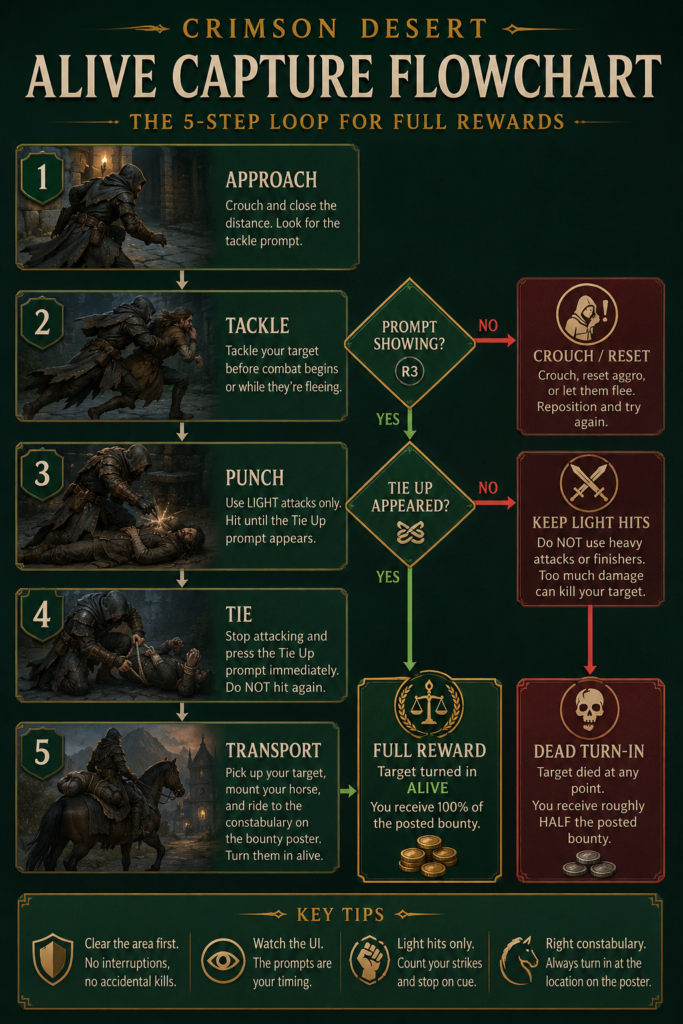
Once you’ve tackled your target and they’re on the ground, you need to punch them down until the Tie Up prompt appears — but not a single hit further. Three light strikes is often enough. The danger zone is using heavy attacks or finishing moves while they’re downed, because those can kill the bounty before the tie option ever appears, immediately locking you into a dead-turn-in at half pay.
Watch the UI carefully after each punch. The moment the Tie Up prompt shows, stop and trigger it. Don’t squeeze in one more hit “to be safe” — that’s exactly how a full-value capture becomes a consolation prize. Use light attacks only, count your hits, and keep your eyes on the screen rather than the target’s health bar.
Transporting to the Constabulary
After you tie them up, pick up the body and load them onto your mount. There’s no separate “stow” button — you simply ride while carrying them, and the game handles the visual. Check your bounty poster for which constabulary accepts the turn-in, as it’s always the one named on the poster rather than the nearest one. Ride there, head to the front desk, and claim your full reward.
If your target dies at any point — during the chase, the punch phase, or even in transport if something goes wrong — you can still turn in the body, but expect roughly half the posted bounty. Some targets do respawn after a period of in-game time if you want another attempt at the full payout.
Step-by-Step: Capturing Any Bounty Alive
Before going into the Bianca walkthrough specifically, here’s the generic loop that applies to any alive-capture target. Getting comfortable with this sequence on an easier bounty first makes the trickier ones significantly more manageable.
Step 1 — Clear the area first. Deal with any nearby enemies or guards before engaging your target. You don’t want adds interrupting the capture phase or accidentally finishing off your bounty while you’re occupied.
Step 2 — Reset aggro. Once the area is clear, don’t immediately charge in. Let your target’s alert state settle so they’re not already mid-attack sequence when you approach.
Step 3 — Approach carefully. Crouch as you close in. Look for the tackle prompt before doing anything else.
Step 4 — Let them run if needed. If the tackle prompt isn’t appearing in a cramped space, let your target spot you. When they flee, sprint after them into open ground where the prompt is easier to land.
Step 5 — Tackle, then light punches only. After the tackle, switch immediately to light strikes and count your hits. Stop the moment Tie Up appears.
Step 6 — Tie and mount up. Trigger the tie prompt, pick them up, and ride to the constabulary on the poster.
That’s the core loop. Bianca introduces a few specific wrinkles — spawn timing, a misleading location, and a cramped interior that makes the chase phase important — but the underlying rhythm is the same.
Bianca Bounty: Full Walkthrough
Bianca is one of Crimson Desert’s early bounty targets and a good showcase of how the alive-capture system can trip you up when a target has specific quirks. The good news is that once you know her spawn window and the right location, the actual capture is fairly clean.
Getting the Poster
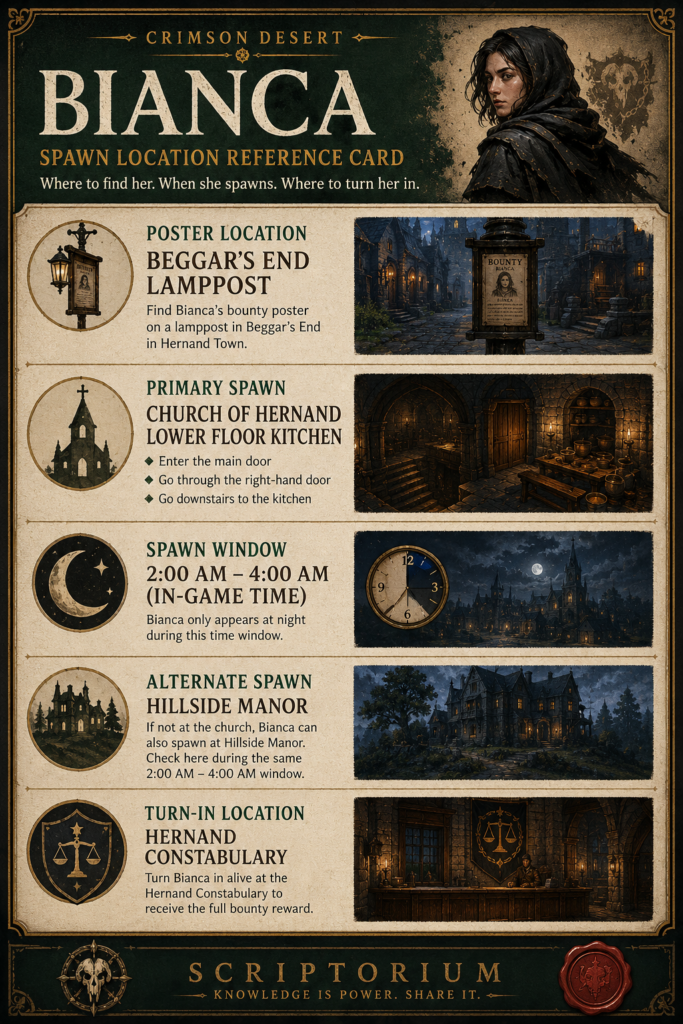
Bianca’s bounty poster is in Hernand Town, near Beggar’s End — look for it on a lamppost in that area. Picking up the poster confirms your target and the constabulary where she needs to be delivered. Note the turn-in location before you head out, as you’ll need it after the capture.
You can get to Hernand Town efficiently using the fast travel system once you’ve unlocked an Abyss Nexus in that region. If you haven’t opened one nearby yet, that guide covers where to find them and how the network works.
Finding Bianca — and Ignoring the Misdirection
This is where players get confused. Bianca is connected to the Church of Hernand on the west side of town, but she doesn’t always appear exactly where you’d expect — and NPC chatter or on-screen icons can send you on a wild goose chase if you’re not locked onto her actual spawn location.
The most consistent spot is the kitchen on the church’s lower floor. Enter the church, take the right-hand door, and head downstairs. That’s where she reliably appears. She can also show up at Hillside Manor as an alternate spawn, which is where the “nun with the two children” confusion comes from — players sometimes see a woman matching her description in a different location entirely and waste time there.
There’s a time component, too. Bianca spawns in the church kitchen reliably between 2 AM and 4 AM in-game time. If you arrive at the church and she’s nowhere to be found, rest or wait until just before 2 AM and check the kitchen again. Trying to hunt her outside that window without knowing her location is what leads to the frustrated forum posts about her “not spawning.”
The Capture Sequence
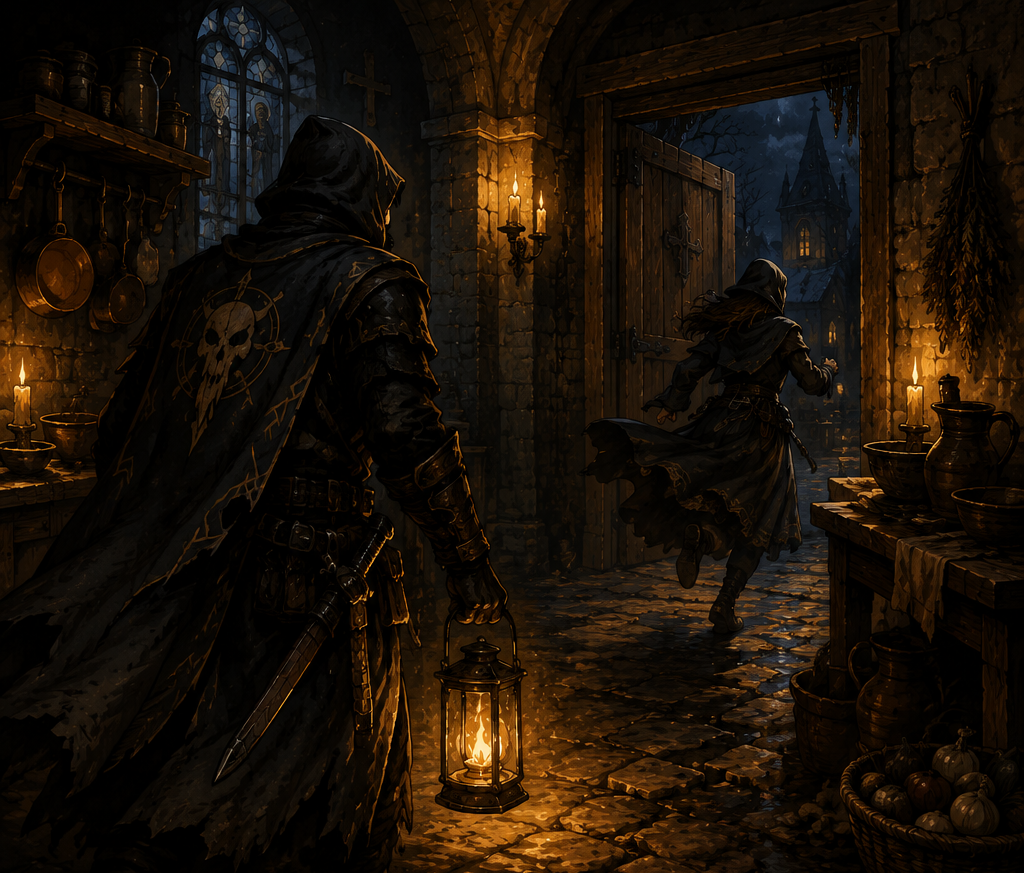
When Bianca spots you, she’ll bolt — typically out through a door into the courtyard. This is actually helpful rather than a problem. The kitchen is cramped enough that trying to land the tackle in there is awkward; let her run into the open air and chase her down into the courtyard where you have real room to work.
Once you’re in the courtyard with her in full flight mode, close the distance, crouch-approach if needed, and trigger the tackle when the prompt appears. After she’s down, stick exclusively to light punches — three hits is typically enough to bring up the Tie Up prompt. Do not use heavy attacks or finishers. Watch for the prompt, trigger it immediately, and pick her up.
Ride her to the Hernand constabulary — the one named on her poster — and turn her in at the front desk. If you’ve kept her alive through the whole sequence, you collect the full reward.
What Happens If She Dies
If Bianca dies at any point during the capture attempt, you can still turn her in for roughly half the posted bounty. It’s worth doing rather than leaving empty-handed, but it stings after all that setup. If you want the full payout, she does respawn after a period of in-game time — some players report success after waiting 24 in-game hours — so you can reset and try again with a fresh attempt.
The mistakes that kill bounties most often: opening with a full combat combo before the tackle (which leads to a chaotic fight and accidental kill), using heavy finishing moves during the punch phase, and trying to tackle in a small interior where the geometry fights against you. Keep it clean, keep it patient, and Bianca is a manageable capture.
Common Problems and How to Fix Them
Even with the loop understood, a few frustrations come up repeatedly in the Crimson Desert community. Here’s what to do when things go sideways.
The tackle prompt won’t appear. You’re almost certainly already in combat mode. Pull back, disengage, let the target’s state reset, and approach again from a neutral position — crouching as you close in. If the space is too tight, let them run into open ground first.
Bounty Hunter Toolkit
Why Isn’t My Tackle Prompt Showing?
Answer three questions to find your fix
The tackle prompt can be fussy. Run through these questions to find out exactly what’s blocking it — then get back to your capture.
Are you already in an active fight with the target?
Did you open with a regular attack or combo before attempting the tackle?
✦ Your Fix
Disengage and reset before tackling
Once you’ve opened with a regular attack, the tackle prompt is gone for that combat exchange. Break off the fight, create some distance, and let the target’s alert state settle. Then approach again from neutral — crouching as you close in — and wait for the tackle cue before touching any attack button.
Still having trouble after resetting? Check whether they’re fleeing or stationary.
Is the target standing still or actively fleeing?
The tackle prompt behaves differently depending on whether the target is stationary, alerted, or running.
✦ Your Fix
Crouch to trigger the prompt on a stationary target
When the target hasn’t spotted you yet, crouch as you approach. Just before you reach them, stand up — this often forces the tackle prompt to appear instead of a regular attack. If the prompt still won’t show, try letting them spot you so they enter a flee state, then chase them down in open ground where the grab has cleaner geometry to work with.
Are you trying to tackle them in a tight interior space?
Small rooms, narrow corridors, and cluttered areas frequently block the tackle from connecting properly.
✦ Your Fix
Let them run outside before tackling
Don’t try to force the tackle in a small space. Let the target spot you and flee — they’ll usually bolt toward a door or into a courtyard. Sprint after them into that open space and tackle there. This is actually the intended method for targets like Bianca, whose kitchen spawn is too cramped for a clean grab. The chase isn’t a problem; it’s part of the loop.
✦ Your Fix
Sprint to close distance as they flee
In open ground with a fleeing target, the most reliable method is a direct sprint to close the gap until the tackle icon appears on screen. Don’t look at the target — watch your UI for the cue. If you’re sprinting and the prompt still isn’t appearing, make sure you haven’t accidentally entered a combat stance first. Let them run a beat, then pursue.
✦ All Clear
Ready to capture
Once the tackle lands: switch to light punches only, watch for the Tie Up prompt, and stop the moment it appears. Three hits is usually enough. Then tie them up, load them onto your mount, and ride to the constabulary named on the poster.
You keep killing the target before Tie Up. You’re hitting too hard or too many times. Count your punches and stop at three. If you’re using a controller, make sure you’re triggering the light attack input rather than the heavy one — it’s easy to mash the wrong button in the moment.
Bianca isn’t in the church kitchen. Either it’s outside her spawn window (2–4 AM in-game) or you’re in the wrong part of the building. Make sure you’ve taken the right-hand door and gone downstairs to the lower floor kitchen. If the timing is wrong, rest nearby and return just before 2 AM.
You can’t find the constabulary. Check the bounty poster — it names the specific constabulary for that target. Bianca turns in at the Hernand constabulary, not a generic nearby one.
What This Teaches You About Crimson Desert’s Systems
The alive-capture mechanic is one of Crimson Desert’s clearer examples of how the game rewards patience and mechanical understanding over pure combat output. Rushing in with your strongest attacks is exactly wrong — the system asks you to hold back, read prompts, and control your force rather than maximising it. That same thinking carries into a lot of the game’s other systems.
If you’re still building your foundation, the Crimson Desert beginner’s guide covers the broader picture of what to prioritise early on. Once you’ve got alive captures working reliably, bounties become a genuinely satisfying loop — steady income, varied targets, and the occasional challenge bounty that puts everything you’ve learned to the test.
The Bianca bounty is a good one to notch early. It teaches spawn timing, location patience, and the importance of the chase phase, all in a relatively low-stakes package. Get that full reward once and the whole system starts clicking into place.
Continue Your Journey
- How the Bounty System Works in Crimson Desert: A Complete Hunter’s Guide — The foundational guide to bounties before you go for alive captures
- Crimson Desert Beginner’s Guide: What to Do First and How Everything Works — Start here if you’re still finding your feet in the game
- How Fast Travel Works in Crimson Desert (and Where to Find the First Abyss Nexus) — Getting to Hernand Town and other bounty locations efficiently
- How to Use Your Lantern and Read Memory Fragments in Crimson Desert — Another system that rewards paying close attention to prompts
- How to Build and Expand the Greymane Camp in Crimson Desert — What to do with all that bounty money
Have you captured Bianca yet? Drop a comment below — did the church kitchen spawn work for you, or did you find her somewhere else first? If you’ve got tips for other tricky alive captures, share them too.
Want guides like this in your inbox before they hit the site? Subscribe to The Scriptorium Newsletter for weekly Crimson Desert coverage and more.
RPG news, GM tips, and system deep dives — straight to your inbox, no filler.


